Global Allow & Block List
Source: support.titanhq.com Product: SpamTitan Imported content type: docs_page Product stream: skellig
Global Allow & Block List
Section titled “Global Allow & Block List”An MSP admin can globally allow or block email addresses, domains or IPs by adding them to your global Allow & Block List.
About Allowing & Blocking
Section titled “About Allowing & Blocking”Email addresses, domains and IPs (MSP level) can be allowed and blocked by being added to your Allow & Block List. It’s important to understand the following when using allow and block lists:
-
IP Allowing (MSP level only): Spam filtering, virus filtering, banned attachments filtering and SPF checks are not performed on IPs that are on the allow list. However, RBL checks and greylisting is still applied.
-
Domain & Email Allowing: Spam filtering is not performed for domains or email addresses that are on the allow list. However, RBL, SPF, greylisting, virus checking and attachment scanning are still applied.
-
Blocking: Spam checking is not performed on IPs, domains or email addresses that are added to your block list, they are automatically blocked.
Allow and Block List Precedence
There are four allow & block list levels in SpamTitan. Each is accessed by logging in at the appropriate access level, or by drilling down to that level as your access allows and going to the Filtering menu:
-
MSP Allow & Block list: Entries apply to all of an MSP’s customers, all their domains and all users of those domains.
-
Customer Allow & Block list: Entries apply to all of a customer’s domains and users of those domains.
-
Domain Allow & Block list: Entries apply to a single domain and all users of that domain. For example, www.example.com.
-
User Allow & Block list: Entries apply to a single user. For example, user@example.com.
Go to Filtering > Allow & Block List and follow the steps below to add an allowed or blocked domain, email address or IP.
Adding an Allowed or Blocked Email
Section titled “Adding an Allowed or Blocked Email”Go to Filtering > Allow & Block List and follow the steps below to add allowed or blocked emails:
-
Select the Emails tab.
-
You can add allowed or blocked emails individually or upload a list of emails in a .csv file.
-
To add allowed or blocked emails individually:
-
Select Add and choose Allow Email or Block Email.
-
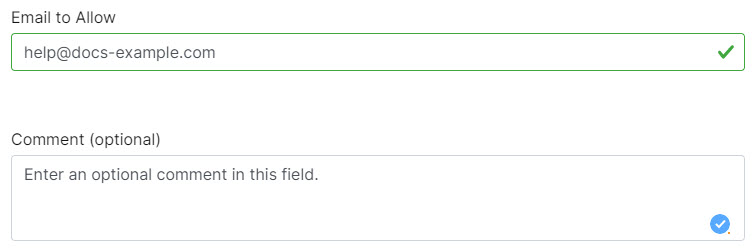
Complete the fields in the pop-up:
-
Email to Allow/Block: an email in the form of user@example.com
-
Comment (optional): Optional comments about this allow or block email.
-
-
Select Allow or Block.
-
-
To upload a list of emails:
-
Select Add and choose Upload Emails.
-
In the pop-up window, drag and drop the csv file to be uploaded.
-
-
Adding an Allowed or Blocked Domain
Section titled “Adding an Allowed or Blocked Domain”Go to Filtering > Allow & Block List and follow the steps below to add an allowed or blocked domain:
-
Select the Domains tab.
-
You can add allowed or blocked domains individually or upload a list of domains in a .csv file.
-
To add allowed or blocked domains individually:
-
Select Add and choose Upload Domain(s).
-
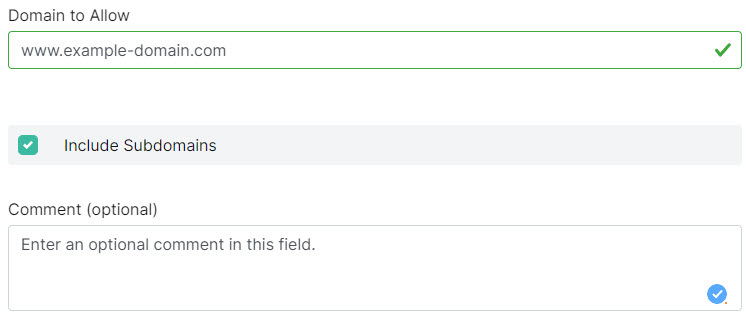
Complete the fields in the pop-up:
-
Domain to Allow/Block: Enter the domain you want to allow or block.
-
Include Subdomains: If your domain is example.com and you select this option, then all domains that end in example.com will also be allowed or blocked. For example, support.example.com and products.example.com.
-
Comments (optional): Optional comments about this allow or block domain.
-
-
Select Allow or Block.
-
-
To upload a list of domains:
-
Select Add and choose Upload Domain(s).
-
In the pop-up window, drag and drop the csv file to be uploaded.
-
-
Adding an Allowed or Blocked IP
Section titled “Adding an Allowed or Blocked IP”Go to Filtering > Allow & Block List and follow the steps below to add an allowed or blocked IP.
-
Select the IPs tab.
-
You can add allowed or blocked IPs individually or upload a list of IPs in a .csv file.
-
To add allowed or blocked IPs individually:
-
Select Add and choose Allow an IP or Block an IP.
-
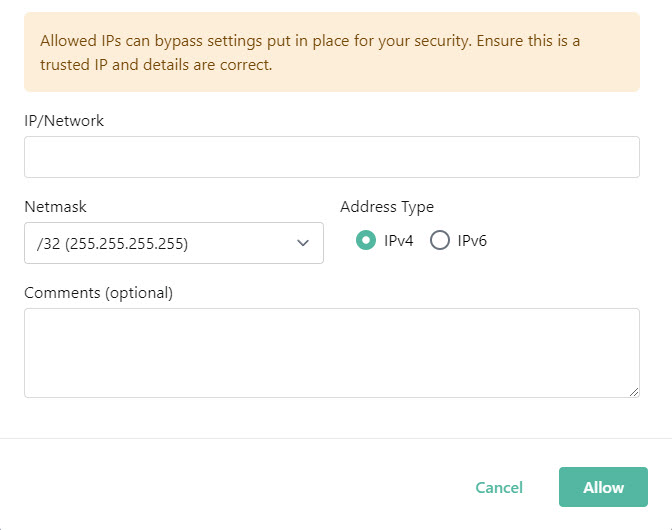
Complete the fields in the pop-up:
-
IP Network: An individual IP address or network range to be allowed or blocked.
-
Netmask: Select the netmask for the specified IP address. Individual IPv4 addresses have a /32 (255.255.255.255) netmask.
-
Address Type: IPv4 (default) or IPv6.
-
Comments (optional): Optional comments about this allow or block IP.
-
-
Select Allow or Block.
-
-
To upload a list of IPs:
-
Select Add and choose Upload IP(s).
-
In the pop-up window, drag and drop the csv file to be uploaded.
-
-